Pages

Monday, 16 May 2016

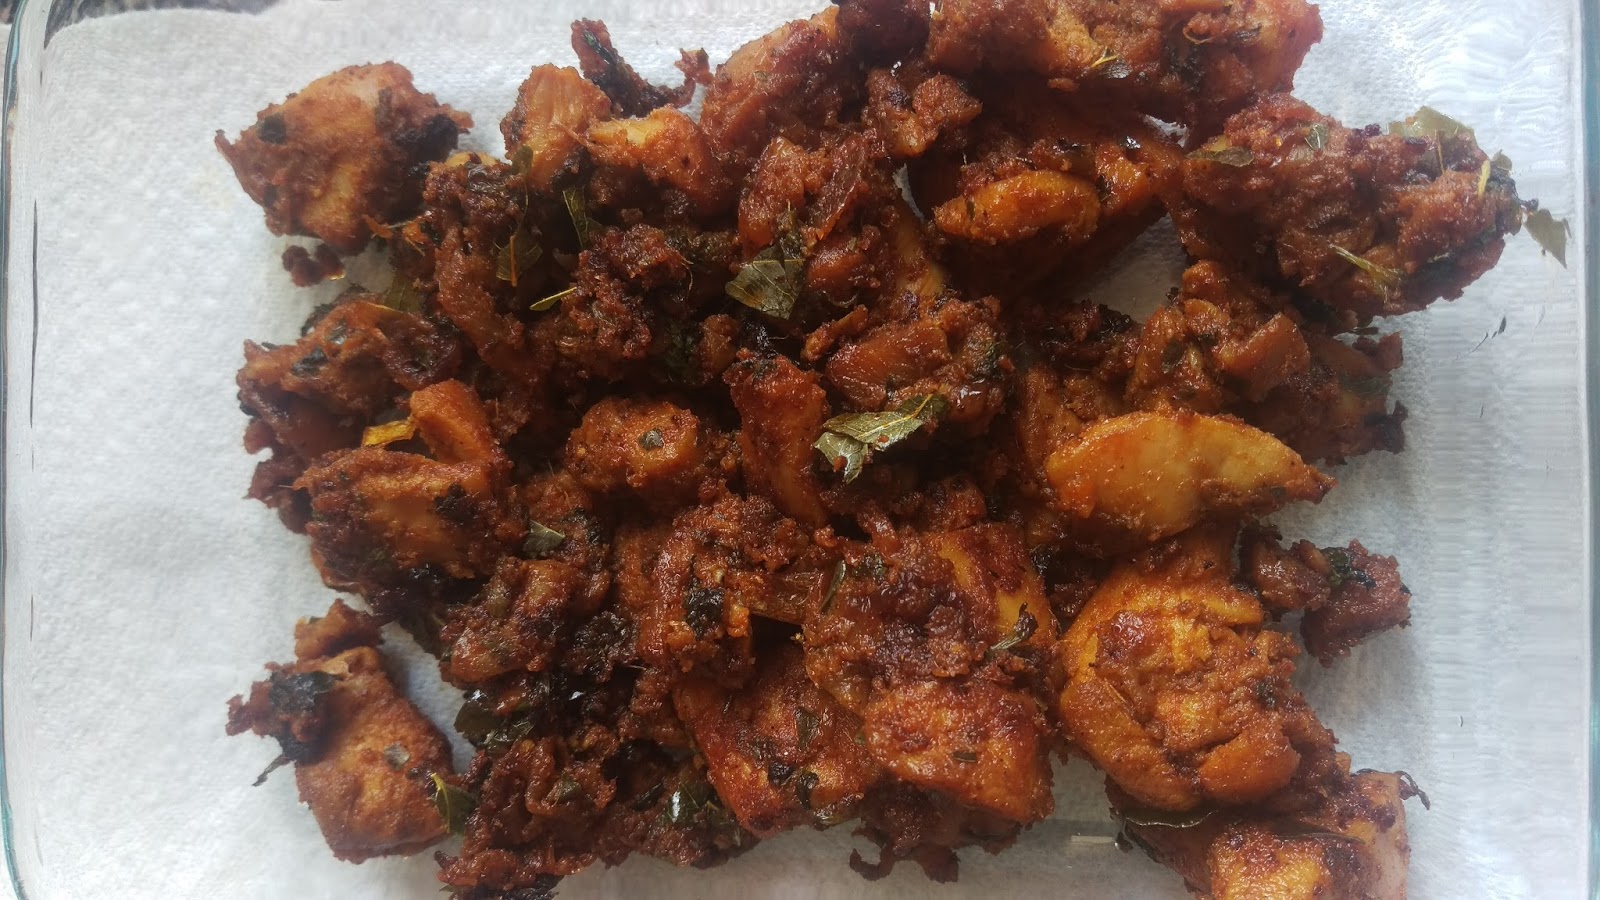
Kodi Vepudu/Chicken Fry

Chicken fry/vepudu or Kodi fry/vepudu is a dry chicken recipe made in most of the Andhra homes.


Ingredients:

Chicken - 500gms (washed and cut into bite sized pieces)
Ginger garlic paste - 1 tbsp
Garam Masala - 1 tbsp
Coriander powder - 1 tspn
Red chilli powder - 2 tbsp
Turmeric powder - 1/2 tspn
Salt - as required
Onions - 1 (sliced thin and long)
Curd - 2 tbsp
Curry leaves - 6 to 7 leaves
Coriander leaves - handful
Oil - 4tbsp

Preparation:

1. Marinate chicken pieces with half of the ginger garlic paste, red chilli powder, salt, turmeric powder, coriander powder, curd. Keep it aside for half an hour.
2. Heat oil in a pan add onions. Once onions are transculent, add remaining ginger garlic paste, curry leaves and fry till the raw smell of it goes.
3. Add the marinated chicken. Mix well and cover it with lid. Cook it on high flame for 20mins. Do not add any water to the chicken as the water that comes from the chicken is enough to cook it.
4. By this time your chicken will be almost cooked (say 90%). Add garam masala powder.
5. Cook on medium to low flame for another 10mins. By this time your chicken is cooked completely and all water is dried.
6. Add coriander leaves and turn off the flame.


Tasty and easy chicken fry is ready. You can have this with chapati/rice or as a side dish for rasam/sambar.

Friday, 13 May 2016

Chicken Pickle


Authentic and colorful Chicken pickle recipe is here... 


Ingredients:

Boneless Chicken - 100gms (washed and cubed to bit sized pieces)
Salt - 2tbsp
Turmeric powder - a pinch
Oil - to fry and mix
Ginger Garlic paste - 1 tspn
Garlic cloves - 2 to 3
Coriander powder - 1 tspn
Garam masala - 1/2 tspn
Chilli powder - 2 to 3 tbsp
Methi Jeera powder - 1/2 tspn
Lemon - 1

Preparation:

1. Add 1tbsp salt and turmeric to chicken and cook on medium heat till the water from chicken is evaporated.
2. Heat oil and fry the cooked chicken on medium heat till they turn brown.
3. Switch off gas and let the oil settles down till it's not too hot or cold.
4. In the warm oil add ginger garlic paste, garlic cloves, coriander powder, salt, chilli powder, methi jeera powder, garam masala.
5. Mix well and add the fried chicken.
6. Adjust salt and chilli powder as per taste.
7. Once the chicken pickle is cooled completely add lemon juice.


Spicy and tasty chicken pickle is ready.

Sunday, 8 June 2014

Spicy Prawns Curry

Yet another sea food recipe in my blog..... Prawns, when made it perfectly it tastes like cashews.


Ingredients:

Prawns - 1/2 kg
Onions-2 large
Green chilli - 5 no
Cashews - 15
Tomato - 1 medium sized
Ginger Garlic Paste - 1 tsp
Garam Masala - 2 tsp
Coriander Powder - 2 tsp
Coriander leaves - 1 bunch
Turmeric powder - 1tsp
Red chilli powder - 2 to 3 tsp
Salt - as required
Lemon juice - 1 tbsp
Oil - 2 tbsp

Preparation:

  1. Wash prawns properly with lemon juice and salt.
  2. Cook prawns with salt and turmeric powder in a pan without water. (When a knife is poked inside the prawn it should come out easily)
  3. Drain leftover water and keep it a side.
  4. Take oil in a pan and add sliced onions, green chillies, cashews.
  5. Once the onions are fried add ginger garlic paste and saute it for 2mins.
  6. Now add chopped toomatoes.
  7. Once tomatoes are cooked add turmeric powder, chilli powder, coriander powder, little salt (as salt is already there in cooked prawns)
  8. Add the cooked prawns in the above mixture and let it cook for 15mins with a lid on it on medium flame. (Saute frequently)
  9. Once the prawns are absorbed with all the flavours, add garam masala and coriander leaves. Let it be on low flame for 5mins and remove it from the stove.


Spicy and tasty Prawns curry is ready. This is not a gravy or a fry item. You can eat this with roti or rice or as a whole.
 

Tuesday, 2 April 2013

Andhra Chepala Pulusu / Fish Curry

One of the most delicious non vegetarian is Fish. Many people think, preparation of fish curry is very difficult compared to other non veg items. But it is very easy and I will tell you the simpliest and tastiest way of preparing it.


Ingredients:

Fish (Korameenu) - 1kg
Onions - 2
Tomato - 1 cut to fine pieces
Green chilli - 4 split to half
Coriander leaves
Lemon juice - 1 tbsp
Oil - 3 tbsp
Tamarind - 3 lemon sized soak in 3 cups of water
Coriander - 1 tbsp
Cloves - 3
Cinnamon - 1 1/2 inch piece
Dry coconut powder - 1 tbsp
Ginger Garlic paste - 1 1/2 tspn
Fenugreek seeds - 1 tspn
Jeera - 1 tspn
Raw mango - 1/2 cut into large pieces
Salt - as per taste
Red chilli powder - 2 tbsp
Turmeric powder - 2 tspn


Preparation:

1. Wash fish pieces with lemon juice and some salt.
2. Soak tamarind in 3cups of water for half an hour.
3. For marination, grind 1 and half onion, coriander seeds, cloves, cinnamon, dry coconut, ginger garlic paste to fine paste.
4. Add salt, red chilli powder, turmeric to the ground paste and apply to the fish pieces.
5. Take a wide and heavy bottomed vessel and add oil to it. Once oil get heated, add the left over onion which is cut into long slices, green chilli, tomato, raw mango slices.
6. Now add the marinated fish pieces to the oil and put on the lid for 10 mins on medium heat. By now the fish pieces will be half cooked.
7. Add the tamarind water to the fish pieces and adjust the taste with little water, salt and chilli powder. Do not add more water as the gravy should not be too runny. Instead adjust salt, chilli powder for the sour taste to reduce.
8. Once if the spices are perfect close the lid and cook for 15mins on high flame and reduce the flame to medium for another 15 to 20 mins.
9. Dry roast jeera and fenugreek seeds and grind it to powder.
10. Add coriander leaves, the ground fenugreek and jeera powder (it gives much enhanced taste) and cook for 2 to 3mins and turn off the stove.


Your spicy delicious fish curry is ready. Usually fish curry taste enhances when it is cooled down.

Wednesday, 27 March 2013

Recipe: Puran Poli/Bobbatu/Poli

Puran poli/Bobbatlu/Poli is a classical Marathi dish, which is a dessert served during auspicious occasions and during important festivals such as Holi, Padwa in Maharashtra.


Ingredients:

1 cup chana dal/bengal gram
1 cup Jaggery (adjust as per your taste)
1 1/2 cups maida/all purpose flour
6 tbsps oil
1/2 tsp cardamom pwd
pinch of salt


Preparation:
1. Mix maida, salt, oil and water to make a soft dough(like chappati dough). Knead well and keep aside for one hour.
2. Soak bengal gram in water for 1 hour and drain the water.
3. Pressure cook bengal gram adding some water till the dal cooks properly. Grind the cooked dal to paste.
4 Heat a vessel, add the grinded dal paste, jaggery and cook till it mix well, without lumps and moisture in it.
5. Add cardamom and salt and combine. Keep aside till it cools.
6. Apply oil to your hand and take small portion of dough and make a small poori.
7. Now take a small portion of the mixture and keep it in the center of the poori and fold from all edges to middle to cover the stuffing.
8. Slowly make the stuffed ball to a poori like the size of the roti.(This is the key thing and you need to be very careful while doing this.)
9. Heat the tawa and roast the roti on both sides by adding oil to it.
10. Before serving apply some ghee on the roti. It tastes delicious.


You can store it in a refrigerator for 2 days.
Hope you like the recipe.

Wednesday, 6 March 2013

Kids Lehanga Designs

Hello everyone...

Today I am going to introduce a new section in my blog. The title itself says its none other than the kids lehangas designed by me.
I am very much interested in designing them for my daughter. This is the first ever lehanga designed by me for my daughters 3rd birthday.

Description:
Lehanga: Tri colored(magenta, green, golden yellow) cross boxes banaras with plain silk magenta color border designed with diamod shaped patches all over it and sequenced with white stones.
Blouse: Sleeveless silk magenta blouse with patches of banaras cloth around the neck and sequenced with white stones. All over blouse is filled with golden color thread dots.

That's my cute little Nivvi on her 3rd B'day

Hope you likes it.

Monday, 4 March 2013

Recipe: Palak Methi Egg Fry

Almost all my recipes will have the background of my daughter. Will think about her in whatever I do. Then came the idea of adding green leaves into her favourite egg fry. If leafy vegetables given separately she will keep them aside. So mixed them in her favourite fry and the idea worked :-) 
 
 
Ingredients:
 
Egg - 1
Palak - 3 to 4 strands
Methi - few
Coriander leaves
Lemon juice- 1/2 tspn
Jeera and Mustard seeds for tadka
Turmeric powder - a pinch
Pepper powder - as required
Salt - as required
Oil - 2 tspn
 
 
Preparation:
 
1. Take oil in a pan and add jeera and mustard seeds.
2. Add tomato, turmeric powder, pepper powder and salt. Cook the tomatoes properly.
3. Break an egg in the pan and fry till it cooks.
3. Add the leafy vegetables (Palak, Methi & Coriander)
4. Let the leaves cook properly until there is no water in the fry
5. Before serving add some lemon juice to it.
 
 
Note: For enhanced taste you can add Chat masala to the fry.
 
It is a very easy recipe and you never regret doing this. Even if I prepared this to my daughter, I personally liked it alot.
 

Tuesday, 12 February 2013

Recipe: Carrot Cake

My daughter likes carrot alot. Recently i started adding carrot in everything and anything for her. So why not add carrot in a cake :-) and so the recipe is out.


Ingredients:
 
Maida-1 cup
Eggs-2
Baking Powder - 1 tbsp
Baking Soda - 1 tspn
Cinnamon powder - 1/2 tbsp
vanila essence - 1 tspn
Carrot - 3/4cup
Salt - 1/2 tspn
Sugar Powder - 1 cup
Oil - 1/2 cup


Preparation:

1. Take a bowl and beat eggs properly for 2 to 3 mins.
2. Add oil to it and beat for another 2mins.
3. In an other bowl add maida, cinnamon powder, Baking soda, Baking Powder, Salt, Sugar powder and mix well.
4. Slowly add the maida mixture to the beaten eggs and stir continuously for 3mins without lumps.
5. Add grated carrot to it and stir properly.
6. Apply some ghee and maida to a bowl and pour the batter into it.
7. Pre heat oven to 350 degrees fahrenheit
8. Bake in preheated oven until the top springs back when pressed.
9. Once the pan becomes cool upside down the pan.


Cut the cake and server yummy, fluffy, soft delicious cake.
Note: For enhanced taste you can add dates, tutty fruity to the batter.


Tuesday, 4 December 2012

Recipe: Chicken Frankie

Another chicken snacker from my kitchen is ready for you... Chicken Frankie.

The delicious roti with mouth watering chicken is an awesome combination. From a very long time I was thinking of preparing this Frankie but the thought was kept aside for no reason. The other day when Frankie stall is opened in our office I put forth my oldest thought of preparing a frankie.
Here goes..


Ingredients:

Egg-1
Butter-2tbsp
Onion-1 big
Green chilli-3
Vinegar-1tbsp
Cheese


For Roti dough:Maida- 2 cups
Oil-1 tspn
Salt - as required
Water-to prepare dough


For chicken stuffing:
Boneless Chicken -150g (cut to bite sized pieces)
curd-1tbsp
Orange color- pinch
Tomato-1 big
Onion-1 big
Ginger Garlic paste-1 tspn
Garam Masala - 1 tspn
Kasuri Methi-pinch
Oil-1tbsp
Coriander leaves-few strands
Salt-as required
Turmeric Powder-1/2 tspn
Red Chilli powder-1 tspn


Preparation:

1. Mix maida, oil, salt and add water to it to prepare like chappati dough. Keep it aside
2. Cut the green chilli into small pieces and add Vinegar to it.
3. In a pan take chicken, curd, a pinch of turmeric powder, salt, orange color and boil till chicken is cooked properly without any water left in it. If required add some water to it.
4. For preparation of chicken stuffing, grind tomato, onion separately.
5. Heat oil in a pan and add onion paste first.
6. Once onion paste is cooked properly add the ginger garlic paste and fry for 2mins.
7. Now add Tomato paste, turmeric powder, salt, red chilli powder.
8. Cook for 5mins and add the boiled chicken, kasuri methi to it.
9. Cook for another 10mins and add garam masala and cook for another. Still if water is there in the gravy increase the flame and cook till water evaporates in the gravy.
10. Add coriander leaves and switch off the stove. The stuffing is ready.
11. Break an egg in a bowl.
12. Prepare roti and place it on tawa. Apply butter or ghee on both sides of the roti and heat it.
13. Apply egg on one side of the roti. Toast it till cooked and both the sides of roti had brown spots.
14. Take the roti on a plate and add onions, green chilli soaked in vinegar and chicken curry in the middle of the roti.

15. Fold the roti inwards from below first and then on both sides. Wrap it with a tissue.

Chicken Frankie is ready....

Hope you like it.

Tuesday, 2 October 2012

Recipe: Chicken 65

Today I will be giving you the very first non-veg recipe in my blog especially for those chicken lovers out there (don't miss me).
Chicken 65 : a spicy, deep fried chicken dish originated from our own Hyderabad.

Ingredients:
 
Boneless chicken - 1/4 kg (cut into small bite sized pieces)
Oil for deep frying
curd - 1/2 cup
Salt to taste
Coriander powder - 1/4 tsp
Lemon juice - 1/2 tbsp
Red chili powder - 1/2 tsp
For Marinating:
Turmeric powder - 1/4 tsp
Red Chili powder - 1 tsp
Pepper powder - 1/4 tsp
Ginger garlic paste - 1 tsp
Lemon juice - 1/2 tbsp
Salt to taste
For Coating:
Egg - 1
Cornflour - 1 1/2 tbsp
Rice flour - 1/2 tbsp
For tadka:
Oil - 1/2 tbsp
Curry leaves - few
Garlic - 2 cloves
Ginger - 1/2", minced
Green chilies - 6, slit length wise
Vinegar - 1 tsp


Preparation:
  • Cut the chicken into bite sized pieces.
  • Add all the marinating ingredients to chicken  and keep it a side for around 45mins to 1 hour in refrigerator.
  • After 1 hour of marination, add the ingredients under coating to chicken.
  • Maximum there will not be any need of water to mix chicken and the coating ingredients.
  • Heat oil in a kadai and once the oil is piping hot, add few chicken pieces at a time and fry on medium flame till chicken is cooked.
  • Once chicken is properly cooked, increase the flame and fry till the chicken pieces change the color to light brown.
  • Take them into a tissue paper. And add the rest of the chicken and do the same process.
  • Mix curd and lemon juice in a bowl without any lumps.
  • In an other pan, heat 1/2 tbsp oil and add minced, curry leaves, garlic, ginger and green chillies and add the fried chicken pieces to it. Toss it for 2 to 3 minutes.
  • Add Vinegar, coriander powder to chicken pieces.
  • Add the curd mixture to the chicken pieces and cook till all the curd is absorbed by chicken pieces.
  • And switch off the stove.
  • Take the content into a plate and garnish with some coriander.
Yipee.... Yummy Spicy chicken 65 is ready.
 Hope you like it.


Tuesday, 11 September 2012

Maybelline Coloroma: Caramelo

Today I will be reviewing my current love for nails :-) - Maybelline Coloroma in Caramelo.
This range of Maybelline has vivid colors both funky, plain. I love the color outcome of this particular shade.


Price and Quantity:


My take on this:

To get the perfect color out of this nailpolish it took me 3 coats. Yes really. It was so transparent that I applied 1st coat... No result. I applied 2nd coat... No result.. I was so disappointed with it. But in the 3rd coat I got my color. Yipeee... I wont bother applying twice or thrice to get my color because I can finish this full bottle quickly and get an other one. So that I can buy more shades.
This has gold shimmer in it which is not so obvious.
It gives out glossy finish for the nails. The glossy look was there for 2 days on my nails.
Decently priced for the quantity.
It was there on my nails without chipping for 3 days. Decent staying power.
But totally I liked the colors in this particular range. 

On my nails:


Final Verdict: Good range with beautiful shades. Try it out. You should have them in your collection. You will definitely don't regret buying it.

Tuesday, 28 August 2012

Recipe: Tomato Pappu

Dal is the item which will be used by everyone and in every region. Today I will give the basic recipe with dal- Tomato Pappu.


Ingredients:

Dal - 1/2 cup
Tomatoes chopped-2
Green chilli chopped-2
Onion chopped-1
Turmeric powder-a pinch
Chilli powder-as required
Salt-as per your taste
Garlic-2


For tadka:
Oil-2tbsp
Red chilli-2
Urad dal, Channa dal,Mustard seeds, Jeera, few Curry leaves.


Preparation:

1. Add dal with tomatoes, half of the onions, green chillies, turmeric powder, chilli powder and salt in a pressure cooker and cook it till 3 whistles (I mean to say till dal is cooked).
2. Once cooked mash dal with added ingredients. Adjust salt and chilli powder.
Now add oil in a pan and add all the ingredients for tadka. Once mustard seeds starts to split, add onions and garlic to it.
3. Once onions are cooked add tadka to the mashed dal.


Tomato pappu is ready.

Recipe: Semiya Payasam

Today we will prepare an other sweet which is well known to everyone. That's none other than Semiya Payasam.
I hope there is nothing much to explain about it. But the only tricky part is to make sure, payasam consistency is not thick.


Ingredients:

Milk
Elachi-4
Sugar-1 cup
Semiya-1 cup
water-2 cups
few cashews, kismis
ghee-2tspn


Preparation:

1. Fry cashews, kismis, semiya in ghee and keep it aside.
2. Now boil water in a pan and add semiya, elachi to it.
3. When semiya is half cooked add sugar to this. Adjust sugar as per your taste. In this stage when you taste it, sweetness should be a bit more than you usually eat for payasam.
4. Once semiya is cooked switch off the stove.
5. When you are about to serve heat the milk, take some cooked semiya in a bowl and add milk to it.
6. Garnish with cashews and kismis.

That's it. Your semiya payasam is ready.


Note: If milk is added to semiya while cooking, after sometime milk will be absorbed by semiya and the consistency will be thick.

Tuesday, 7 August 2012

Thalimpu Rice with Left Over Rice

Everyone will be thinking what to do with the leftovers. We can't throw them off just like that. I will maximum try to utilize it.
Coming to the rice... When leftover there are some many recipes that you can do with it.
You can prepare lemon rice or rice thadka (thalimpu annam)


Thalimpu Annam Recipe:

Ingredients:
1 cup Cooked rice
2tbsp oil
few channa dal, urad dal, mustard seeds, jeera
2 red chilli
curry leaves, coriander leaves
1/2 lemon
few ground nuts
Salt
Turmeric powder
1 onion chopped
2 green chilli splitted


Preparation:
1. Mix salt in rice. Make sure rice should not have any lumps.
2. Take oil in a kadai and add channa dal, urad dal, mustard seeds, jeera, red chilli, curry leaves, groundnuts
3. Once tadka is done add green chilli, onion, turmeric powder and fry it till onion are transulent.
4. Now squeeze half a lemon in the mixture and add rice mixed with salt and let it be there for 5mins.
5. Garnish with some coriander leaves.


That's it your thalimpu annam is ready.
You can eat it with or without any side dish.

Himalaya Herbals Kajal

Today i am doing a review on Himalaya Herbal Kajal.
Before starting my review I would like to tell you that i have watery eyes.
There are few qualities that everyone ought to look when comes to kajal:
Color
Smudge free
Sting
Staying power


Product Claims:
Extra smooth & Water proof
Enriched with Almond Oil that nourishes your eyes, keeps them cool and makes you look fresh and bright.
A unique blend of herbal extracts that cools and nourishes your eyes.
No harmful chemicals.
Hypoallergenic.

    Directions:

Apply kajal within the lash line.
Key ingredients:
Almond oil, Castor oil,Camphor, Damask Rose, Triphala


Price: 110Rs for 2.7gms

Please check out the below snap for the color and smudging effect:


When comes to Himalaya products I will buy them without any hesitation as they are totally herbal. One good thing about these products are either they provide good result or not... they won't be bad on you.
Coming to the kajal here are the pros and cons of it:

Pros:
  • The color of it is darkest dark- perfect black.
  • It doesn't sting my eyes.
  • Packaging is good with green color outer cap.
  • Hygenic- as there is no need of digging your finger to get the product.
  • Plastic packaging with twist up cone shaped product.
  • Easily removable with any cleanser or oil.
  • Reasonable priced for the amount provided.
Cons:
  • It is not smudge free. It smudges badly when wiped.
  • Staying power is ok ok. Stays for maximum 2hrs (may be because of my watery eyes).


Finally, I would say this is not a super duper best kajal but a good daily wear kajal.

Will I repurchase? No. This iteself will last me for long time. I will try other kajals in the market just to keep them in my collection if needed. Even I am not a kajal person as they smudge and makes me look like a racoon.

Hope you guys found my review useful.

Thursday, 2 August 2012

Arts&Crafts: Anchor Stitch Kit

Stiching is my hobby. Still I like to do simple works which completes in small durations (I dont want to stress my eyes by stiching delicate designs)

In search of those kind of works I came across this Anchor Stitch kit. Till then I thought the easy way to create decorative wall hangings is by sand painting. Anyways it is not as easy as sand painting but yet simple compared to other stiching works.
Manyfactured by Madura Coats Private Limited.


Items provided in the kit:


  1. Netted sheet with printed design and clues to fill the colour.
  2. Cotton threads. Each will have a number associated to it and in the kit alphabets will be provided for each color. These alphabets will be provided as clues in the netted sheet.
  3. Needle
Price: somewhere around 300Rs (I don't remember this exactly. As I bought this 1 and half years back


How to Stitch:


Only thing we need to do is to identify proper color and stitch in the vertical directions in the netted sheet for the part related to that color. Needle needs to be taken up from back side of the hole from the top border and should be inserted into the hole of bottom border in the same line.


Its very simple and they have very good collection of designs in different sizes.
We can decorate this by pasting some chamki or kundans etc. Frame the sheet. It looks beautiful with the work. Even if there is no separate border for two colors in the design we can differentiate the design properly. Availability is not a problem.
Hope you people like this.Try to do this you will never regret of buying these designs.

Monday, 23 July 2012

Carrot Kheer recipe

"The rain that falls on a day when you'd just as soon stay in bed a little longer, write letters or read a good book by the fire, take early tea with hot scones and jam and look out the streaked window with  complacency."  ~Susan Allen Toth, England For All Seasons

Instead of "tea with hot scones and jam" I will add hot hot Carrot Kheer (drooling over :-))

Last saturday it was pouring heavily in hyderabad. Imagine sitting near a window, watching rain with a bowl full of hot sweet (here it is a sweet as I like treating my taste buds with hot sweet/hot chocolate...). Yes this is what i did on saturday. I prepared this awesome Carrot Kheer. It came out really good that after serving to my hubby and his friends, a very little is left for me and my sis to eat.


Ingredients:

5 cups milk
2 cups grated carrot
5 tbsp sugar
3tbsp ghee
4 to 5 elachi
few cashews and kismis

How to prepare:

1. Boil milk in a bowl till it becomes to 21/2 to 3 cups.
2. Take 3tbsp ghee in a pan and fry cashews and kismis
3. In the same pan with leftover ghee fry grated carrot for 10 to 15mins
4. Once carrot is cooked add bolied milk and stir occasionally for 10mins. Now add elachi and sugar to this. cook it for another 5mins.
5. Add roasted cashews and kismis to this.And yes you are done with piping hot Carrot Kheer

It is awesome when it is hot.

Thursday, 19 July 2012

Rava Kesari

Come on girls... Today we will prepare Rava Kesari... Yummy yet easy to prepare.

All you need is

2 cups milk
1 cup sugar
1 cup bombay rava
4 to 5 elachi
few cashews and kismis
3tbsp ghee


Take tawa add 1 tbsp ghee and roast cashews and kismiss. In the same tawa roast rava.
Now take a heavy bottemed bowl and add milk, sugar and elachi. Once bolied add roasted rava. You have to stir while adding rava and stir continuously till it becomes thick. Add another tbsp of ghee in it and stir again. Add roasted cashews and kismiss. Switch off the stove. You can eat it directly by taking it into a bowl.

Or take a plate and apply ghee to it. Pour the mixture immediately in the plate and spread it evenly. Leave it for sometime and cut into pieces. You can preserve this for 2 to 3 days in refrigerator. Either you can eat hot or cold.


Yummy Yummy Rava Kesari ready!!!

You can add color to this as well by adding Saffron in some warm milk and mix it while preparing this.


Tuesday, 17 July 2012

Maybelline Color Sensational Lipstick in Autumn Rush

To brighten up your dull and boring day, switch on your makeup mode and take out a bright lippie or a bright nailpolish.Hurray!!! Your are all set to normal.

One day I went to H&G to get a lipstick for my friend. When I was checking lipsticks in Maybelline counter, I saw this cutely packed Maybelline Colorsensational lipstick in Autumn Rush. I fell in love with this in the first swipe.

Maybelline color sensational range has very good collection. It is a great value for money.
Look at the packaging!!! A see through maroon case with silver bottom. So cute!!


It is a nice soft brown shade with no shimmer in it. The day I bought this lippie I used it like mad (You will definitely accept this after seeing my lipstick pic). It can be worn anytime, anywhere irrespective of occassion or dress.


Pros:
They are super pigmented. One swipe and you are done with it.
It is super smooth on lips. Use it with a lip balm under this for better results. Moisturizes well.
Comfortable to wear.
Non drying.
Stays for about 3-4 hours.
It is easy to remove.
Packaging is good.
Decently priced at Rs.299 for 4g.


Cons:
Don't find any cons.

But the saddest part of this story is, they discontinued this particular shade in colorsensational range. :-(